Wildcard domains DNS and local WAMP for website development

When developing websites on a local WAMP installation, I often need control over the DNS. It is no problem to add a hostname to the Windows hosts file, but a wildcard in the domain does not work. For example you need a wildcard domain when installing Wordpress Multisite locally with subdomains. This article has the solution to add wildcards to your local WAMP installation, without installing Bind or other heavy DNS solutions.
Configuring WAMP for wildcard domains
If you not WAMP installed already, you can find here: www.wampserver.com/en/ After the download you can install it with the default parameters.
After installation it is possible to open a webpage at http://localhost/
Enable Virtual hosts on WAMP
When WAMP is running, you will see a green icon on the task bar. To enable virtual host, we need to configure it.
Left-click on the green WAMP icon and go to menu: Apache->httpd.conf Press in Notepad Ctrl-F and search for: httpd-vhosts Remove the ’#’ before the Include to include the httpd-vhosts.conf file
# Virtual hosts
Include conf/extra/httpd-vhosts.conf
Adding Virtual hosts on WAMP
To add the Virtual hosts, open Notepad, open file and browse to this file (default installation): C:\wamp\bin\apache\Apache2.2.21\conf\extra\httpd-vhosts.conf
In httpd-vhosts.conf you can add the virtual hosts you need, here is an example for two virtual hosts. You can put here also more virtual hosts. Special in the configuration is the ServerAlias to provide the wildcard (’*’) in the domain.
<VirtualHost *:80>
   DocumentRoot "C:\wamp\www"
   ServerName mydomain.local
   ServerAlias *.mydomain.local
</VirtualHost>

<VirtualHost *:80>
   DocumentRoot "C:\wamp\www"
   ServerName myotherdomain.local
   ServerAlias *.myotherdomain.local
</VirtualHost>
Now save the httpd-vhosts.conf file and restart the WAMP server.
Configuring DNS wildcards with Acrilic DNS Proxy
I was looking for a tool like this for a long time. Normally I had to configure Dnsmasq on a Linux machine, but with Acrylic it is a lot more easier and all local on a Windows machine.
Download Acrilic DNS Proxy from Sourceforge: sourceforge.net/projects/acrylic/
After installation go to menu: Start->Programs->Acrilic DNS Proxy->Config->Edit Custom Hosts File
Add the folowing lines on the end of the file:
127.0.0.1	*.localhost
127.0.0.1	*.local
127.0.0.1	*.lc
Now you need to restart the Acrilic DNS Proxy service. Go to menu: Start->Programs->Acrilic DNS Proxy->Config->Restart Acrilic Service
Do not forget to change your Network adapter settings:
- go to menu: Start->Control Panel->Network and Internet->Network Connections
- Right-click on your current network adapter and select Properties
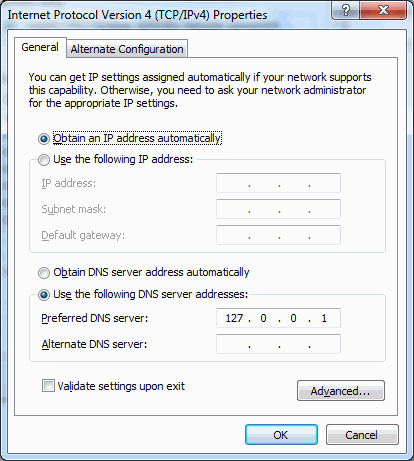
- Now select Internet Protocol Version 4 and click on the Properties button
- Fill in the localhost IP number (127.0.0.1) at the DNS section (see picture) and press OK.
The result and Wordpress Multisite
Now you are able to ping a domain like: hello.mydomain.local. Also to run a website with domain names like hello.mydomain.local locally.
It is also possible to run a site like Wordpress.com. This is a Wordpress installation with multiple subdomains under it. Previously it was called Wordpress MU. Since Wordpress 3.0, multisite is integrated into the normal release of Wordpress.
How to configure Wordpress Multisite you can read in this article: Configuring Wordpress 3 with Multisite and second level domains