This howto is tested on Windows XP SP3 and Windows 7. Probably it also will work on Windows Vista. The router I used is the Fritz!Box WLAN 7170, but the tools for the other Fritz!Boxes like the Fritz!Box 7270 are the same, so it will also work for the other Fritz!Box routers with VPN capabilities.
Replacement for the unstable FRITZ!VPN client
This post describes the configuration of a replacement for the unstable official FRITZ!VPN client (English v01.01.03 or German v01.02.02).
This replacement is the Shrew Soft VPN client, which can be downloaded (for Windows) from: shrew.net/download/vpn
Installing the ShrewSoft VPN client
To use this client, do the following steps:
- Download and install the ShrewSoft VPN client.
- Accept all warnings and when installing, press Next in all screens.
- Select that you trust software from Shrew Soft and press OK.
- Then press Finished
Configuring the ShrewSoft VPN client
Start the VPN client with the following menu path:
Start->All Programs->ShrewSoft VPN Client->Access Manager
Click on the ‘Add’-button to Add your VPN connection.
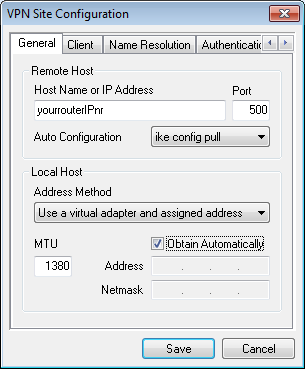
The General tab
Remote Host:
- Host Name or IP Address: fill in your Fritz!Box router external IP nr at ‘yourrouterIPnr’.You can find your external IP address, when you are using the router, goto: checkip.dyndns.com
- Leave the other settings as default.
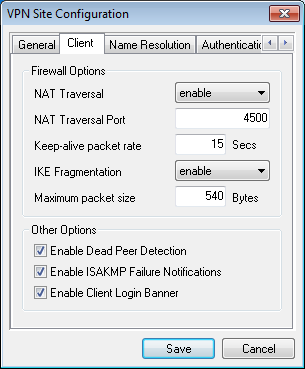
The Client Tab
The default settings are ok.
The Name Resolution tab
WINS / DNS:
- Deselect ‘Enable WINS’
- Deselect ‘Enable DNS’

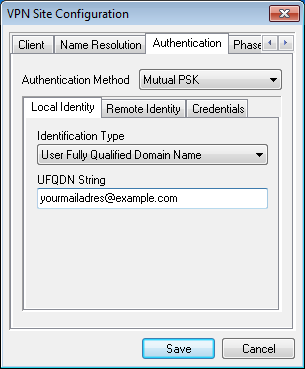
The Authentication->Local Identity tab
- Authentication Method select: Mutual PSK
- Identification Type select: User Fully Qualified Domain Name
- Fill in at UFQDN String, your VPN email address: yourmailadres@example.com (which is also used for the VPN cfg-file)
Remark: Select ‘User Fully Qualified Domain Name’ and not of ‘Fully Qualified Domain Name’. You can make easily this mistake. Otherwise it will not work!
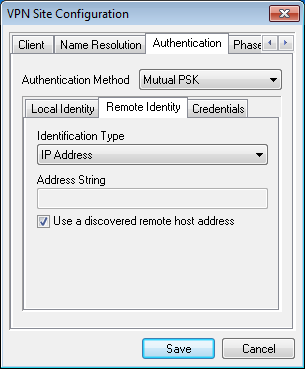
The Authentication->Remote Identity tab
- Select at Identification Type: IP Address
- Leave the other settings as default.
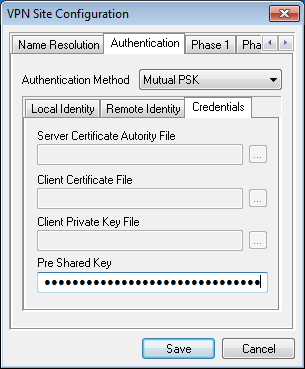
The Authentication->Credentials tab
Now open the VPN user configuration file in an editor. This file is generated by the program ´Configure FRITZ!Box VPN Connection´.
- The filename is something like: vpnuser_yourmailadres_example_com.cfg
- Search in the .cfg-file to the key-value. You can find this in the structure targets.policies.key. Copy the key value without the quotes.
- Past the key-value in the ‘Pre Shared Key’ field.
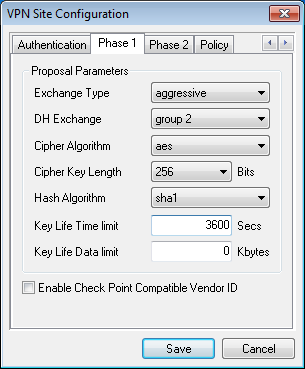
The Phase1 tab
Proposal Parameters:
- Exchange Type select: aggressive
- DH Exchange select: group 2
- Cipher Algorithm select: aes
- Cipher Key Length select: 256
- Hash Algorithm select: sha1
- Key Life Time limit: 3600 Secs
- Key Life Data limit: 0 Kbytes
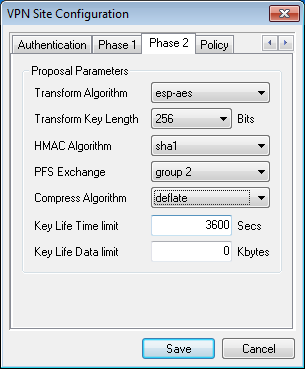
The Phase2 tab
Proposal Parameters:
- Transform Algoritm select: esp-aes
- Transform key length select: 256
- HMAC Algorithm select: sha1
- PFS Exchange select: group 2
- Compress Algorithm select: deflate
- Key Life Time limit: 3600 Secs
- Key Life Data limit: 0 Kbytes
The Policy tab
IPSec Policy Configuration:
- Deselect ‘Maintain Persistent Security Associations’
- Deselect ‘Obtain Topology Automatically or Tunnel All’
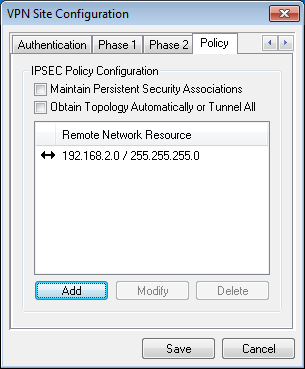
- Click on Add
- Type select: Include
- Fill in your remote network Address: 192.168.2.0 (in our case)
- Netmask: 255.255.255.0

- Click on ‘Save’ to save your complete VPN Site configuration
- Now your VPN connection name/IP address is selected, you can change it in a readable VPN name
Testing the VPN
- Click on your VPN connection name
- Click on ‘Connect’
- Click in this new window again on ‘Connect’
- The VPN connection will be build up
- You can minimize this window, but if you close this window, the VPN will also be closed.
Shrew Soft VPN Access Manager Preferences
To show the VPN Access Manager in the system tray, do the following:
- Go to menu: File->Preferences
- Access Manager, Windows Style select: Visible in System Tray only
- VPN Connect, Window Style select: Visible in System Tray only
- Select: Minimize when connection succeeds
- Click on OK
This article belongs to the Fritz!Box VPN guide. The other articles in the guide are:
- FRITZ!BOX VPN
- Configuring the Fritz!Box router
- VPN via FritzBox on Windows
- VPN via FritzBox on Linux